
Project: Encrypted Communication (updated)
Objectives
In this project, you will gain experience using cryptographic primitives to implement encrypted communication between a client and a server.
We are providing you with a server and your job will be to write a client to communicate with it.
Project Setup
Download the handout for this assignment and unzip it.
You need Rust 1.98 or newer, the same version the Rust book uses. Run
rustup update to get the latest version.
The handout includes a server for each kind of computer in the binaries
folder. The README.md in the handout tells you which one to run. On a Mac,
you must first run the command it gives you, or macOS will stop the server as
soon as it starts. On Windows, use WSL and the Linux server.
Client-Server Protocol
The client and server communicate using the following protocol:
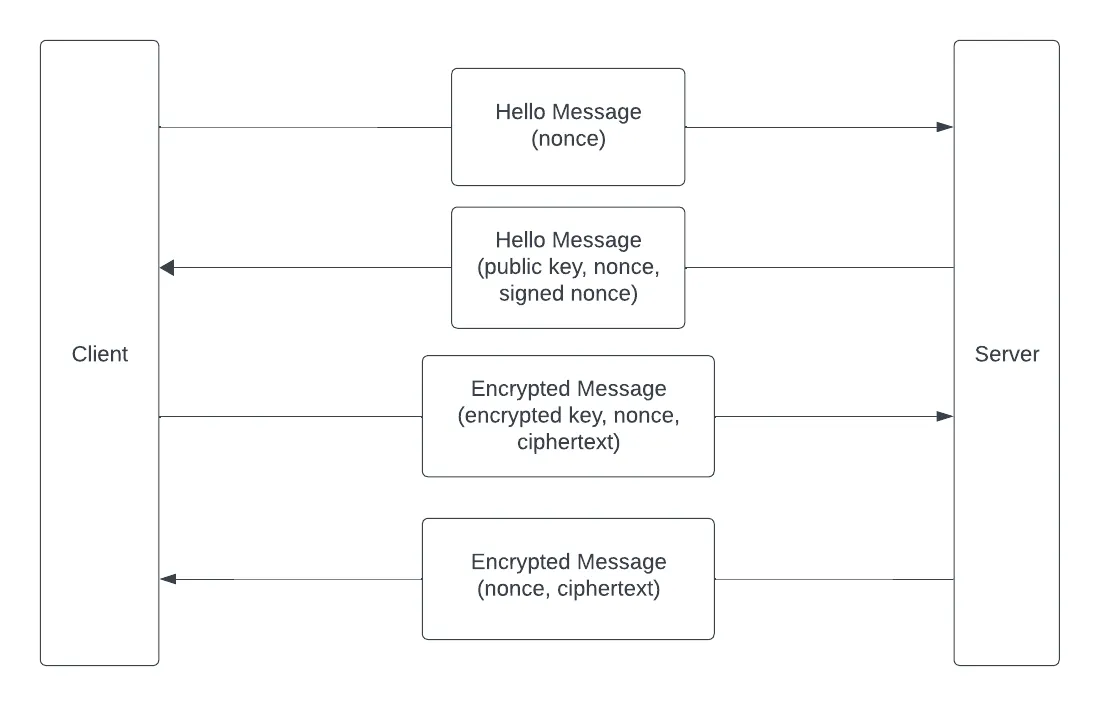
- The client sends the server a Hello Message containing a random nonce
- The server responds with a Hello Message that includes its RSA public key (in PEM format), the nonce, and its signature on the nonce. The server signs with RSA-PSS using SHA-256.
- The client verifies the signature on the nonce that it sent (not the copy the server sends back) and, if the signature is valid, accepts the server’s public key
- For every message the client sends to the server it:
- Creates a new symmetric key K and a nonce
- Encrypts the key K with the server’s public key, using RSA-OAEP with SHA-256
- Encrypts the message with K, using AES-GCM
- Sends the server an Encrypted Message message that includes the encrypted key, the nonce, and the encrypted message
- The server responds to an Encrypted Message with a Server Response that
includes:
- a new nonce
- the message, encrypted with the same key but the new nonce
- The client decrypts and prints each Server Response the server sends it
Implementing the Client
You should write your code in the provided src/main.rs:
use std::net::TcpStream;
mod messages;use messages::{EncryptedMessage, HelloMessage, ServerResponse};
fn main() {    let mut stream = match TcpStream::connect("127.0.0.1:2222") {        Ok(stream) => stream,        Err(_e) => {            println!("Could not connect to server. Check that it is running");            return;        }    };    println!("Connected to server");}
This code connects to the server and then exits. You should add code so that the client:
- sends a Hello Message
- parses the server response
- loops
- reads some text from the terminal
- if the text is “exit”, break from the loop
- otherwise, send an Encrypted Message
- parse the Server Response
You will need two terminals. In the first, start the server for your computer
(see the handout’s README.md), for example on a Mac with Apple Silicon:
./binaries/server-macos-arm64# note, quit the server with control-cIn the second, run your client. A sample session should look like this:
cargo runConnected to serverHello exchangedEnter message: this is a test messageReceived: this is a test messageEnter message: lovely to see this workingReceived: lovely to see this workingEnter message: exitMessages
We have provided a src/messages.rs module that provides structs for the
different message types as well as methods that convert these structs to/from
JSON. You should be able to use this module without making any changes to it.
For example, here is a Hello Message:
#[derive(Serialize, Deserialize)]pub struct HelloMessage {    pub signed_message: Vec<u8>,    pub pub_key: String,    pub nonce: [u8; 32],}
impl HelloMessage {    pub fn to_json(&self) -> Result<String, serde_json::Error> {        serde_json::to_string(self)    }
    pub fn from_json(message: String) -> Result<HelloMessage, serde_json::Error> {        serde_json::from_str(&message)    }}
You can create an initial Hello Message with:
// assume you have created the noncelet hello = HelloMessage { signed_message: vec![], pub_key: String::new(), nonce,};and convert it to json:
let json = hello.to_json()?;Likewise when you receive a message as bytes, you can convert it into a JSON
string and then convert that JSON string into a message, e.g. using
HelloMessage::from_json().
TCP Stream
The client and server use a TCP socket to send messages. Using the stream
TCPStream object in the provided code, you can use the following methods.
To write to the TCP stream:
// json should be the result of one of the to_json() methods abovestream.write_all(json.as_bytes())?;To read from the TCP stream:
// we assume that all messages are shorter than 4096 bytes and// will be read in one call to read()let mut buffer = [0; 4096];let bytes_read = stream.read(&mut buffer)?;// read() returns 0 if the server closed the connection// an example of how to convert the buffer to a JSON string// you can do something similar for other message typeslet server_hello_json = std::str::from_utf8(&buffer[..bytes_read])?;See the following for additional documentation:
Rust Crypto
For the Rust crypto, use:
- rsa — the client will need to import the server’s public key from the PEM format it receives, verify the server’s RSA-PSS signature on the nonce, and encrypt the symmetric key with RSA-OAEP
- PSS Signature and
PSS VerifyingKey —
the client will need to convert a signature in bytes to a
Signature(see thetry_from()method) and verify it - OAEP — the padding to use when encrypting the symmetric key
- AES GCM — the client will need to generate a symmetric key, generate a nonce, and encrypt and decrypt
You can see the
Rust Cryptography examples we
covered in class as examples of how to use these libraries. The rsa-example
and aes-example use the same crate versions as this project.
Rust Tips
(1) These are the imports you are likely to need:
use aes_gcm::{ Aes256Gcm, aead::{Aead, Generate, Key, KeyInit, Nonce},};use rsa::{ Oaep, PublicKey, pkcs8::DecodePublicKey, pss::{Signature, VerifyingKey}, sha2::Sha256, signature::Verifier,};(2) This code uses a nonce that is 32 bytes long. You can generate this with:
let mut nonce = [0u8; 32];rand::fill(&mut nonce);(3) To import the server’s public key and create a verifying key, you can use:
let public_key = PublicKey::from_public_key_pem(&pem)?;let verifying_key = VerifyingKey::<Sha256>::new(public_key.clone());(4) To encrypt the symmetric key with the server’s public key:
let encrypted_key = public_key.encrypt(&mut rand::rng(), Oaep::<Sha256>::new(), key.as_slice())?;(5) To generate a symmetric key and a nonce, and to import a nonce from the server:
let key = Key::<Aes256Gcm>::generate();let nonce = Nonce::<Aes256Gcm>::generate();let nonce = Nonce::<Aes256Gcm>::try_from(nonce_bytes.as_slice())?;Grading Rubric
- Total (100 points)
- 20 points for sending the server a valid Hello Message
- 20 points for sending the server a valid Encrypted Message
- 20 points for sending the server a symmetric encryption key that is encrypted with its public key.
- 20 points for sending the server a message that is correctly encrypted with the symmetric key and nonce
- 20 points for using a new encryption key and nonce with every Encrypted Message
Checking your work
The TAs will grade your client by running the server with --grade, and you
can use the same method to check your work before you submit. Start the server
for your computer with --grade, for example:
./binaries/server-macos-arm64 --gradeThe server then prints each part of the protocol your client gets right, and a score out of 100 when your client exits. Send at least two messages so it can check that you use a new key and nonce for each one.
Submission
Use the tar command and your BYU netID to compress your files:
tar --exclude=target --exclude=.git -czvf byuNetID.tar directorySubmit your tar file on Canvas.