Project: Encrypted Communication
Objectives
In this project, you will gain experience using cryptographic primitives to implement encrypted communication between a client and a server.
We are providing you with a server and your job will be to write a client to communicate with it.
Project Setup
Download the handout for this assignment and put it in a folder. The handout includes a Dev Container, so When you open this folder in Visual Studio Code, it should ask you to reopen it in a container.
Using a Linux container will enable you to run the binary for the server, which has been compiled for Linux.
Client-Server Protocol
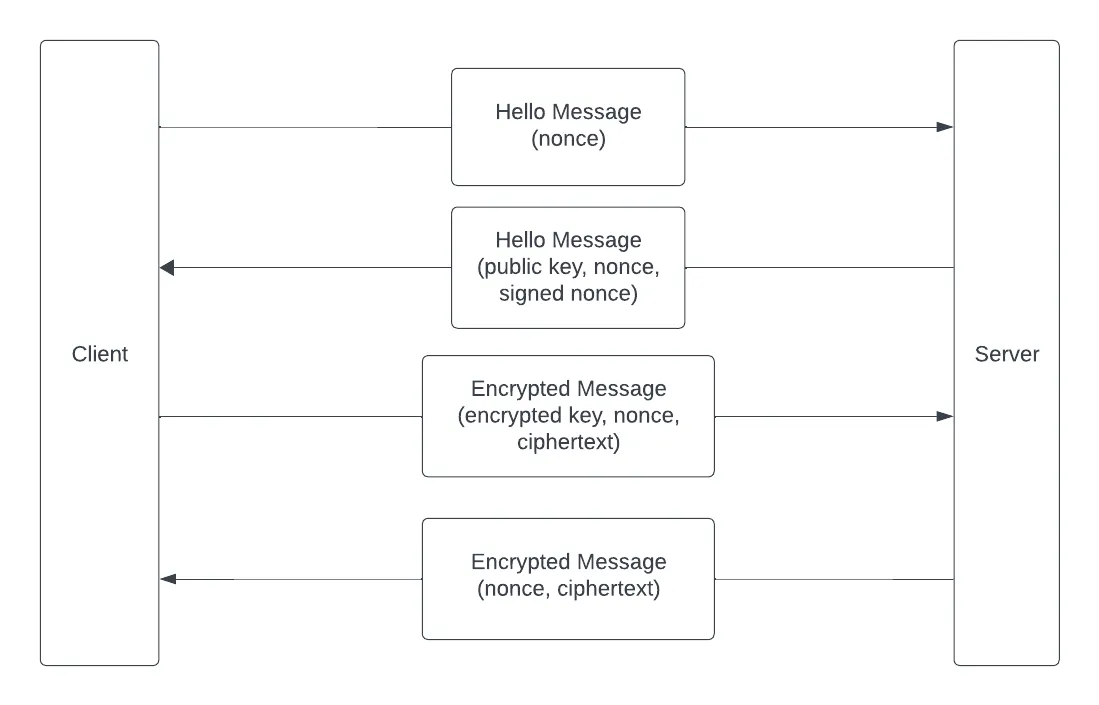
The client and server communicate using the following protocol:

- The client sends the server a Hello Message containing a nonce
- The server responds with a Hello Message that includes its RSA public key (in PEM format), the nonce, and a signed version of the nonce
- The client verifies the signature and, if it is valid, accepts the server’s public key
- For every message the client sends to the server it:
- Creates a new symmetric key K and a nonce
- Encrypts the key K with the server’s public key
- Encrypts the message with K
- Sends the server an Encrypted Message message that includes the encrypted key, the nonce, and the encrypted message
- The server responds to an Encrypted Message with a Server Response that
includes:
- a new nonce
- the message, encrypted with the same key but the new nonce
- The client decrypts and prints each Encrypted Message the server sends it
Implementing the Client
You should write your code in the provided src/main.rs:
use std::net::TcpStream;
mod messages;use messages::{EncryptedMessage, HelloMessage, ServerResponse};
fn main() {    let mut stream = match TcpStream::connect("127.0.0.1:2222") {        Ok(stream) => stream,        Err(_e) => {            println!("Could not connect to server. Check that it is running");            return ();        }    };    println!("Connected to server");}
This code connects to the server and then exits. You should add code so that the client:
- sends a Hello Message
- parses the server response
- loops
- reads some text from the terminal
- if the text is “exit”, break from the loop
- otherwise, send an Encrypted Message
- parse the Server Response
A sample session should look like this:
./binaries/server# note, quit the server with control-ccargo run clientConnected to serverHello exchangedEnter message: this is a test messageReceived: this is a test messageEnter message: lovely to see this workingReceived: lovely to see this workingEnter message: exitNote, you will need to open two terminals for this project. If the server doesn’t have the proper execution permissions, you can add them:
chmod u+x ./binaries/serverMessages
We have provided a src/messages.rs module that provides structs for the
different message types as well as methods that convert these structs to/from
JSON. You should be able to use this module without making any changes to it.
For example, here is a Hello Message:
#[derive(Serialize, Deserialize)]pub struct HelloMessage {    pub signed_message: Vec<u8>,    pub pub_key: String,    pub nonce: [u8; 32],}
impl HelloMessage {    pub fn to_json(&self) -> Result<String, serde_json::Error> {        serde_json::to_string(self)    }
    pub fn from_json(message: String) -> Result<HelloMessage, serde_json::Error> {        serde_json::from_str(&message)    }}
You can create an initial Hello Message with:
// assume you have created the noncelet hello = HelloMessage { signed_message: vec![], pub_key: "".to_string(), nonce,};and convert it to json:
let json = hello.to_json()?;Likewise when you receive a message as bytes, you can convert it into a JSON
string and then convert that JSON string into a message, e.g. using
HelloMessage::from_json().
TCP Stream
The client and server use a TCP socket to send messages. Using the stream
TCPStream object in the provided code, you can use the following methods.
To write to the TCP stream:
// json should be the result of one of the to_json() methods abovestream.write_all(json.as_bytes());To read from the TCP stream:
// we assume that all messages are shorter than 4096 bytes and// will be read in one call to read()let mut buffer = [0; 4096];let bytes_read = stream.read(&mut buffer)?;// an example of how to convert the buffer to a JSON string// you can do something similar for other message typeslet server_hello_json = str::from_utf8(&buffer[..bytes_read]).expect("Server hello not in UTF8");See the following for additional documentation:
Rust Crypto
For the Rust crypto, use:
- Rsa — the client will need to convert the
public key from the PEM format it receives, derive the verifying key from the
public key, verify the
PKCS#1 v1.5signature on the nonce, and encrypt the symmetric key withPkcs1v15Encryptpadding - PKCS #1 v1.5 Signature -
the client will need to convert a signature in bytes to a Signature struct,
see the
try_from()method - AES GCM — the client will need to generate a symmetric key, generate a nonce, and encrypt plaintext
You can see the Rust Cryptography examples we covered in class as examples of how to use these libraries.
Rust Tips
(1) This code uses a nonce that is 32 bytes long. You can generate this with:
let mut nonce = [0u8; 32];thread_rng().fill_bytes(&mut nonce);(2) To create a verifying key, you can use:
VerifyingKey::<Sha256>::from_public_key_pem()(3) To import a nonce from the server, you can use:
let nonce = Nonce::from_slice(&nonce_vec[..]);Grading Rubric
- Total (50 points)
- 10 points for sending the server a valid Hello Message
- 10 points for sending the server a valid Encrypted Message
- 10 points for sending the server a symmetric encryption key that is encrypted with its public key.
- 10 points for sending the server a message that is correctly encrypted with the symmetric key and nonce
- 10 points for using a new encryption key and nonce with every Encrypted Message
Submission
Use the tar command and your BYU netID to compress your files:
tar --exclude=target --exclude=.git -czvf byuNetID.tar directorySubmit your tar file on Learning Suite.